
Over the past few weeks, I started this habit of using two different brush pen colors to demonstrate how I connect basic strokes to form letters. I used this method in a couple of videos on my YouTube channel, in videos and photos I posted on Instagram, and here on the blog.
The feedback I have received has been amazing! The most common thing I have heard so far is how the use of two colors helps to really “see” how the basic strokes are connected. So I thought this post would be helpful to share a little bit about the method behind the madness. Read on to learn more about my new favorite teaching (and practicing!) method, followed by a video demonstration where I show you exactly how it all works.
Why you should use two different colors when connecting basic strokes to form letters
Before I show you the benefit of using two different color of brush pens, take a look at how the basic stroke connects look with only one color:

Using one color is not a terrible thing, especially when you see a letter broken down into individual basic strokes as you see here.
But take a look at the final result on the right. Once those basic strokes are connected, you lose sight of the exact start and end of the strokes because it all seems to blend together into one cohesive unit.
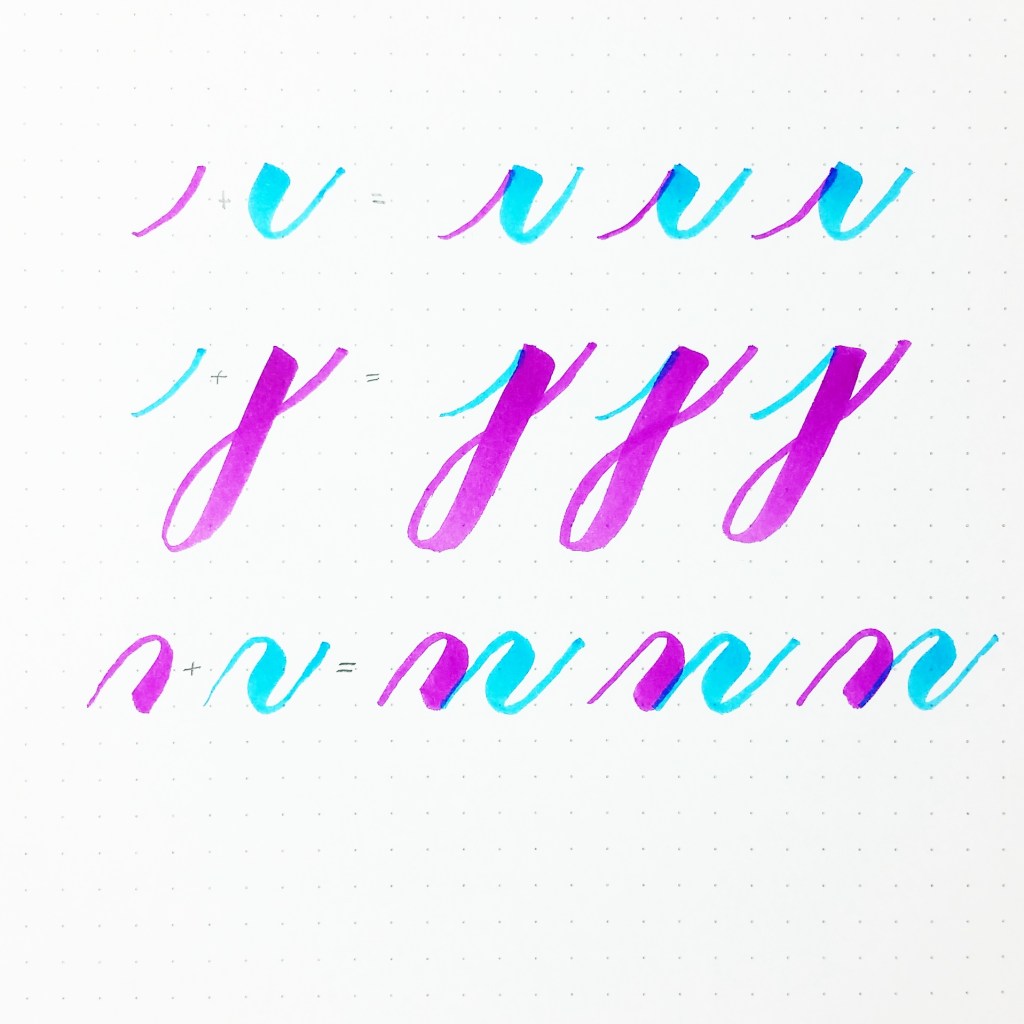
Let’s compare this example to using two different colors.

When you use two different brush pen colors, you are doing a couple of things:
First, you are literally, physically breaking down the strokes to form the letters, which is the very key to creating beautiful brush calligraphy. In last week’s post on tips for connecting basic strokes to form letters, I emphasized the importance of lifting to allow your letters to breathe, to give your brush calligraphy a more elegant look, and to allow you to look ahead to the next letter.
Second, you are forcing yourself to go slow. By having to pick up one pen, write a single stroke, place the pen down, pick up the next pen, and repeat, you are taking the time to do these things. What better way to ensure you are slowing down than to put a process in place that makes you pause and take a second before creating the next stroke?
Third, you are able to actually see how the basic strokes are connected. When your letters are all the same color, it is difficult to pinpoint where a stroke starts and stops, particularly when it is in the middle of the word. This is a challenge for beginners who may not necessarily know how the strokes connect to each other, where to place the next stroke, and how the connections should look after they are all put together. The different colors give a viewer a sense of where the calligrapher lifted the pen and then placed the pen back down onto the page.
Practice Drills: Connecting basic strokes with alternating colors
Try these drills to see for yourself why this method is not only a great teaching tool, but an incredibly helpful way to practice and build muscle memory. Beginners should especially utilize this method for slowing down, creating each stroke slowly, and understanding where their strokes connect well and where there is improvement to be made.
Connect two basic strokes at a time:
- Entrance stroke + underturn stroke
- Entrance stroke + descending stem loop
- Overturn stroke + compound curve

Don’t limit yourself to only these three drills! There are so many other two-stroke combinations you can practice.
Connect three basic strokes at a time:
- Entrance stroke + underturn stroke + underturn stroke
- Entrance stroke + ascending stem loop + compound curve
- Entrance stroke + oval + descending stem loop

Again, don’t limit yourself to only these three drills! There are so many other three-stroke combinations you can practice.
Video: Improve your letters by using two colors of brush pens
Watch the following video to see me demonstrate this two-color brush pen method.
~ ~ ~
It’s your turn! Tell me in a comment below:
Have you tried this two-color method? How did it go for you?
What is your biggest struggle when it comes to connecting basic strokes?
Do you have any other tips to share when connecting basic strokes?
~ ~ ~
P.S. If you liked this post, please share it with a friend!
P. P. S. If you haven’t already done so, subscribe to my blog below so you get my posts directly in your inbox!
Follow me on Instagram: @piecescalligraphy
And now on Periscope! Find me at @piecescalligraphy
~ ~ ~
Supplies used:
Sakura Koi coloring brushes (Paper & Ink Arts)
Rhodia dot pad (Amazon / Paper & Ink Arts)

Leave a Comment