Basic brush calligraphy strokes: The entrance/exit stroke

Basic strokes are the building blocks of your brush calligraphy foundation. Not flourishes, not design, not even letters.

It’s all about the basic strokes.

Over the next couple of weeks, I will be devoting one blog post (and video!) for each of the basic strokes you need to master as a brush calligrapher.

Let’s start with the entrance stroke.

basic strokes: entrance stroke

What is the entrance stroke?

The entrance stroke is a thin upstroke that begins, or enters, into a letter. It starts at the baseline and ends at the waistline.

basic strokes: entrance stroke

How to create the entrance stroke

To create the entrance stroke, first be sure you are holding the pen properly and facing it in the right direction.

Start by placing the tip of your brush pen at the baseline. Then draw a thin upstroke with a slight curve as shown in the photo. End the stroke at the waistline.

basic strokes: entrance stroke

wpid-img_20151101_152655.jpg

The entire stroke should maintain the same thinness and it should slightly curve to the right.

You may be shaky at first, or unfamiliar with how the stroke should feel as you create it. But as always, practice makes progress. I share practice drills at the end of this post for you to work on.

When to use the entrance stroke

Since the entrance stroke is the beginning of a letter, it’s no wonder the entrance stroke is used in the entire alphabet!

Specifically, the entrance stroke is used for every miniscule, or lowercase letter. It is also used in many connectors between letters. We’ll talk about connectors in future posts.

Here are examples of the entrance stroke being used in the letters io, and j:

basic strokes: entrance stroke

Practice Drills

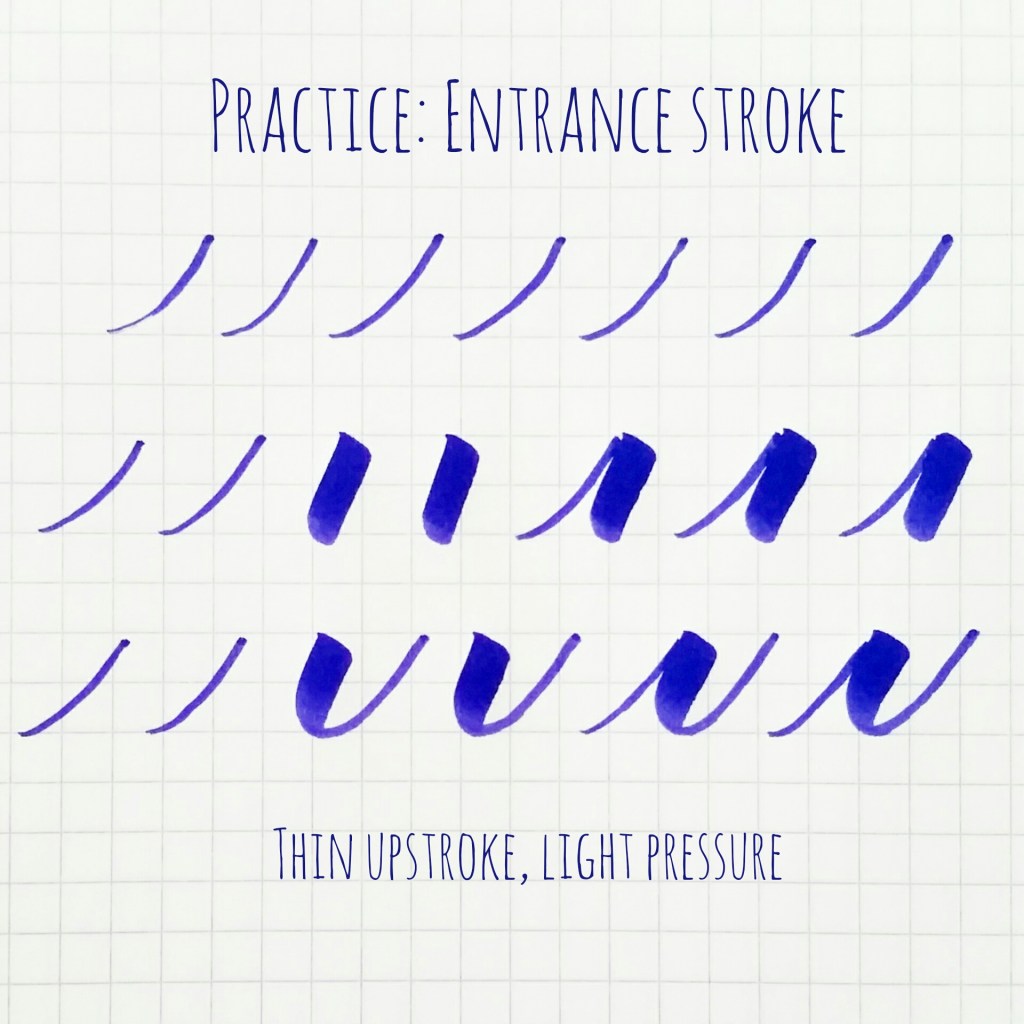
Do these practice drills to improve your entrance stroke. Don’t worry about making it as thin as a hairline. The key is to create thin upstrokes that are dramatically smaller in width than your thick downstroke.

basic strokes: entrance stroke

  1. Entrance stroke: Fill a page with entrance strokes. Focus on the position of your hand, your grip, your technique, and the forming of the stroke.
  2. Entrance stroke + full pressure stroke: Connect the entrance stroke to the full-pressure stroke. After creating the entrance stroke, lift your pen and slightly move it to the right of the top of the entrance stroke. Don’t worry about perfecting the full-pressure stroke. We will discuss the full-pressure stroke into more depth in a future post.
  3. Entrance stroke + underturn stroke: Connect the entrance stroke to the underturn stroke.

If you mess up, keep going. Focus on the next stroke. Remember that you will only improve when you keep on practicing and experimenting and learning.

Video: The Entrance Stroke

~ ~ ~

It’s your turn! Tell me in a comment below:

Have you tried the entrance stroke? How would you describe your experiences so far?

What is the hardest part about the entrance stroke for you?

Are you posting your work on Instagram? Be sure to share by tagging #pieces_basicstrokes!

~ ~ ~

P.S. If you liked this post, please share it with a friend!

P. P. S. If you haven’t already done so, subscribe to my blog below so you get my posts directly in your inbox!

Follow me on Instagram: @piecescalligraphy

46 responses to “Basic brush calligraphy strokes: The entrance/exit stroke”

  1. Mirjana Avatar

    This is such a great post and video! Thank you!

    Like

    1. piecescalligraphy Avatar

      Hi, Mirjana! You are so welcome! 🙂 🙂

      Like

  2. Shari Avatar
    Shari

    Thank you very much.. All of these videos are very helpful.

    Like

    1. piecescalligraphy Avatar

      Glad you are finding them helpful. Thanks, Shari!!! ❤ ❤

      Like

  3. Christie Eli Avatar

    My connecting up stroke seems shackey , not as neat as I’d like.

    Liked by 1 person

    1. piecescalligraphy Avatar

      Hi Christie! Don’t worry about shakiness. The more you write and get used to the pen, you will find yourself gaining more control and therefore being less shaky. If you continue to be shaky, try a new grip or try taking breaks during your practice sessions.

      In the beginning, it is more important to focus on proper form and creating the stroke with the right shape. Hope this helps!

      Like

  4. Mariam Avatar
    Mariam

    This is so helpful, especially for beginners like me who want to start with the right basic strokes as foundation for brushes. I’ve been trying to find for some time tutorials that starts from the basics, but haven’t found any until now. Thank you again!!

    Liked by 1 person

    1. piecescalligraphy Avatar

      So happy to hear, Mariam. Did you see my “Learn” page? Go to https://piecescalligraphy.com/learn to see all of my tutorials sorted by category. Happy writing! Let me know what you need help with.

      Like

  5. Maeve Avatar

    Hello! Its me maeve, well thank you so much for sharing a lot of things, I am exited to try. Very clear to understand and may I know how to find the paper, squares papers for basic learning. Or do have it so may be we could download it?

    Like

    1. piecescalligraphy Avatar

      Hi, Maeve! I will work on getting downloadable grid sheets soon! In the meantime, you can use regular graph paper or any paper with lines like a legal pad or binder paper. Just be sure the paper is smooth and not textured. My absolute favorite paper is the Rhodia grid pad. Hope this helps!

      Like

  6. Andrea Goo Avatar

    This is sooooo great! Now when do we get downstrokes? 😊

    Liked by 1 person

    1. piecescalligraphy Avatar

      Now!!! I posted yesterday (Nov 15th) on the overturn stroke, which is a stroke that begins with a thin upstroke and transitions into a thick downstroke. Take a look and let me know what you think!

      Like

  7. Natalie Avatar
    Natalie

    Thank you so much!! I’m just starting out so I really find your post so helpful!

    Like

    1. piecescalligraphy Avatar

      Hi Natalie! You are so welcome and happy writing! Let me know if you have any questions.

      Like

  8. Kerry Avatar
    Kerry

    I really appreciate your posts. I’m practicing every morning before work!

    Like

    1. piecescalligraphy Avatar

      Fabulous! Keep up the great work, Kerry!

      Like

  9. Jo Avatar
    Jo

    Thanks for these tutorials!! I am learning how to do this lovely art — I am a total newbie, and can’t get enough of your work!! Hopefully I can pick this up as quickly as you did! 😀 I find the entrance stroke to be fairly easy but do struggle with the amount of curve and how wide it should be. Since I’m using Rhodia lined paper, it’s not easy to judge the width of the stroke each time. Thanks again for the lovely tutorials. I watched the video too and found it immensely helpful when you showed how to connect to example letters!

    Like

    1. piecescalligraphy Avatar

      Hi Jo! You are so welcome. The curves and thick/thin transitions are tricky, but very doable once you learn the proper letterforms and really increase your muscle memory. Regarding the Rhodia lined paper – try tracing over some of the lines with a pencil to make them stand out to you. Then as you write, keep your pen between the lines. Let me know if that helps.

      Like

  10. Amanda Avatar
    Amanda

    Hi Sherisse, I’ve been following you on IF for awhile and received some Tombow pens and a Rhodia notepad for Christmas and excited to get to work! I’m planning to work through all of your videos and just wanted to say thanks for posting all of this! Can’t wait to see where all of this takes me!

    Like

    1. piecescalligraphy Avatar

      Hi, Amanda! You are so welcome. And hooray for your pens and paper!!! Just in time for the ABC challenge (@handletteredABCs). You’ll be joining us, right?! 🙂

      Like

  11. Julie Avatar
    Julie

    Thank you – my goal in 2016 is to learn some fun new ways to use my brush pens now that I’ve learned calligraphy 🙂 Any tips for lefty’s? Your videos are great!

    Like

    1. piecescalligraphy Avatar

      Hi, Julie! Why, yes! Please visit my “Learn” page for a couple of blog posts that were written for lefties. See: piecescalligraphy.com/learn. Hope you find them helpful! Let me know if you have any questions. I have tons of lefty calligraphy and handlettering friends who are more than willing to share their knowledge!

      Like

  12. Isa Avatar
    Isa

    Oh, thank you so much for this tutorial! I’ve just begun with lettering and this has helped a lot. Al least my strokes are more beautiful now! 😀

    Like

    1. piecescalligraphy Avatar

      You are very welcome! I am happy to hear your improvement. Keep it up!

      Like

  13. Cat Avatar
    Cat

    I’ve always wanted to learn calligraphy and I’m so excited to go through all your tutorials. I am going to buy a dip pen from Michaels tomorrow but for now, I’m using my Zig Clean Color just to play. Wow! Controlling the amount of pressure I put on the pen is a lot more important and difficult than I imagined. Really appreciate you making these tutorials available!

    Like

    1. piecescalligraphy Avatar

      Thanks for stopping by, Cat! And happy writing! Let me know if you have any questions.

      Like

  14. jaimeta303 Avatar

    Hello! I have just received my calligraphy supplies and got started right away! I used the links you provided, I’m glad you mentioned the little kickback, happy to help. I was pleasantly surprised when I found myself shopping on Amazon from your links, yay! The two videos I watched were pen direction and entrance stroke. I filled a whole page, and will be back for more this weekend! The blog and video are wonderful, thank you!

    Like

    1. piecescalligraphy Avatar

      Hi and yay!!! Happy writing! Thanks for using my links – it’s a tiny bit of help to me, but help I very much appreciate! Let me know what questions you have. Enjoy!

      Like

  15. Julie Avatar

    I love your site! I’m learning brush calligraphy and your posts and videos are excellent.

    Like

    1. piecescalligraphy Avatar

      Thanks for stopping by, Julie! I really appreciate your kind words. Happy writing! 🙂

      Like

  16. Kalyeegraphy Avatar

    this is sooo great! just what I needed. :”) thank you for sharing this!

    Like

    1. piecescalligraphy Avatar

      You are very welcome! Happy writing!

      Like

  17. fragilestrength85 Avatar
    fragilestrength85

    As part of your basic stroke series, how much time should one focus on a stroke before moving on to the next? Or does it vary? 🙂

    Like

    1. piecescalligraphy Avatar

      You can go as fast or as slow as you’d like. My recommendation for beginners is to devote at least an week to each basic stroke to ensure you really understand it. During that week, be sure to try and connect the stroke to others strokes so you can start getting a feel for how they all connect to each other. At the end of each of my basic stroke posts, I share some practice drills that will help.

      Like

  18. Pearl Avatar
    Pearl

    Hi!You’re amazing!Thank you so much for sharing these 🙂

    Like

    1. piecescalligraphy Avatar

      Thank you so much, Pearl! You are very welcome.

      Like

  19. amberbrooke3 Avatar

    Thanks this was so helpful! As a beginner, i have been having trouble lately. my letters all look shakey and ridged. I am left handed and I am wondering if maybe that is part of my problem…my brush pens seem to split easily at the tip, and I am wondering what I am doing wrong 😦 any tips? Thank you!

    Like

    1. piecescalligraphy Avatar

      Hi Amber! Shaky is very common, especially as a beginner and when you are starting out. Being left-handed is not the issue – it has more to do with being comfortable with your brush pen and building your muscle memory of strokes and letterforms. Take a look at my lefty tips on my “Learn” page (piecescalligraphy.com/learn). Hopefully some of those posts help, especially with how to hold your pen. As for your pen splitting at the tip – this happens if you are using a rough or porous type of paper. Try a smooth, non-textured paper to give your pen a very gentle surface to glide upon. Also, be sure you are holding the pen at an angle – if you hold it too upright, it will kink and bend and fray more easily. Let me know if this helps!

      Like

  20. kayechampion Avatar

    I’m late to this series, but I’m excited to learn and your comment about not worrying about hairline strokes was very freeing because that is what has frustrated my earlier attempts. I also need help on holding pen at the right angle as my transition from thick to thin is hard to do

    Like

    1. piecescalligraphy Avatar

      I’m so happy to hear! Thanks for visiting and you are NEVER too late for the series. In fact, I’m going to relaunch the series next year because it’s such a great way for beginners to get started, as well as seasoned calligraphers to refine their skills.

      Have you seen my posts on grip and holding the pen correctly? Take a look and let me know if you have questions: https://piecescalligraphy.com/learn

      Like

  21. Carolina Avatar
    Carolina

    Hi. I’m new here. I’m Southamerican and I learn to write with Calligraphy, but I’m a bit rusty becayse I don’t write anymore, all is technology now. Your tutorials are so great. I’m teaching my kids because I hate that they write print and not handwriting. I see that you use a notebook with a small square grid and coil, where can I found it? I live in Canada and here it’s all composition and I’m an alien if I ask for squares, even more if I ask for 5mm. Kids don’t use squares, even for math classes is composition. Very weird to me. Never mind, thank you for your blog, it’s an amazing tool and tell me where did you find your marvellous square grid with coil notebook. I miss them!!

    Like

    1. piecescalligraphy Avatar

      Hey Carolina! I”m so happy to hear you are teaching handwriting to your children, especially in this technology-driven world. Hold onto that with your children. They will thank you later and also be well ahead of their peers. Such a great value to instill in them. I got the spiral notebook on Amazon. You can also find links to similar notebooks on my supplies page (piecescalligraphy.com/supplies). Hope that helps!

      Like

  22. Janelle Avatar
    Janelle

    Hi, glad I happened across this pin! Do you recommend a certain pen?

    Like

    1. piecescalligraphy Avatar

      Hey Janelle! I recommend a couple of pens over on my supplies page (see the link in my menu bar, or go to piecescalligraphy.com/supplies). Let me know if you have any questions!

      Like

  23. Swastiga Avatar
    Swastiga

    Hi, I am Swastiga from India. I am so glad to pick your lessons quickly and clearly. Learning Calligraphy and lettering has always fascinated me. Unfortunately the city in which i live down south , Coimbatore doesn’t provide any calligraphy lessons for the adults. So it came to a point where I have to self-learn. With copious learning materials and videos available online i am lucky to get a hack of the techniques you teach . It doesn’t mean i am being unfair to the content of other online tutorials, however i really appreciate the easiest and an understanding way you have put the whole thing across. I could vividly see an up curve in my progress graph within three days of every stroke i learn and practice.

    Hoping to learn the basics well and enjoy the thrills and fun of the acquiring this skill and keep moving forward with the movement drills. Thank you !

    Like

    1. piecescalligraphy Avatar

      Swastiga, this makes my heart so full. Thank you so much for sharing your experience and letting me know that my teachings are helping you! Keep working hard – it will pay off! 🙂

      Like

Leave a Comment

Hi, I’m Sharisse

I love teaching brush calligraphy to others so they can enjoy a creative outlet, slow down, and experience the peace and joy lettering can bring — even in the middle of busy everyday life. As a wife and mama, I know how precious time can be, which is why I create beginner-friendly lessons designed to feel simple, encouraging, and approachable. Whether you think you have “bad handwriting” or you’re completely new to calligraphy, I’m here to help you build confidence and enjoy the process one step at a time.

What My Past Students Are Saying…

“I finally feel like I understand how everything works.”
— Judy, CA

“Your teaching style made calligraphy feel much less overwhelming.”
— Emily

“I feel so much more confident with my brush lettering now.”
— Elma

“Everything is explained in a way that’s simple and easy to follow.”
— Eluci

My Recent Post