

Welcome to Part 6 of my Basic Brush Calligraphy Strokes series!
So far, we have reviewed the:
Before you get started, be sure to familiarize yourself with these previous posts:
- Brush pens recommended for beginners
- Holding your brush pen properly
- Facing your brush pen in the right direction
If you are on Instagram, share your work by posting it with the hashtag, #pieces_basicstrokes.
Now, let’s talk about the ascending stem loop!

What is the ascending stem loop?
To understand the ascending stem loop, let’s review the following terms:
- An ascender is any stroke that goes above the waistline. For example, there is an ascender in the lowercase d, h, l, and t.
- A stem is the backbone of a letter. You will see more stems in letters as we review uppercase letters in a future post.
- A loop is exactly what it sounds like, a loop. It is a stroke that forms an enclosed space and usually is connected to a stem.
Now that we’ve reviewed those terms, an ascending stem loop, or ascender loop, is a basic stroke that forms many letters of the alphabet which extend above the waistline.
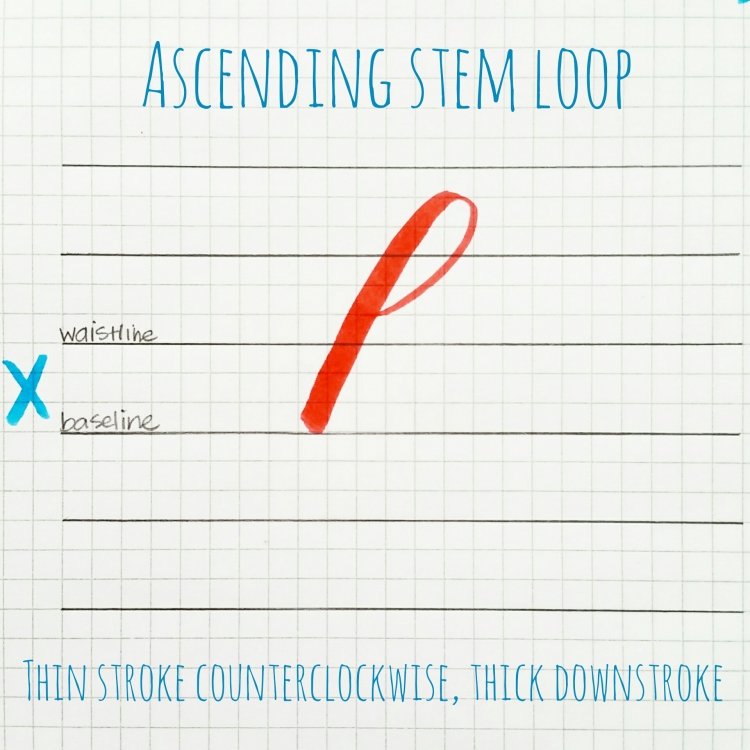
How to create the ascending stem loop
To create the ascending stem loop, start with light pressure just above the waistline. Create a thin stroke that curves counterclockwise toward the ascender line. Maintaining light pressure, continue curving around until you start going downward, then transition slowly into a straight, thick downstroke. Head toward the baseline and end with full pressure.

The key with the ascending stem loops is to maintain a thin stroke in the beginning until after you begin transitioning into a thick downstroke.
You may be shaky at first, or unfamiliar with how the stroke should feel as you create it. But as always, practice makes progress. I share practice drills at the end of this post for you to work on.
*A note on guidelines*
The guidelines you see here are one option you can use. There are other options with different ratios that we will review in a future post. For instructional purposes, we will stick to the ratio you see here. See this post by Nina Tran for more information on guideline ratios.

When to use the ascending stem loop
The ascending stem loop is used in the letters: b, f, h, k, and l.
Note that in the letters b, f, and l, the ascending stem loop transitions into an underturn stroke.

Practice Drills
Do these practice drills to improve your ascending stem loop.
Don’t worry about being perfect or creating strokes that are completely free of any shakiness. Shakiness is expected in the beginning! When you are still learning the brush pen and when you go slow (which you SHOULD), then shakiness is normal.
Try these practice drills. Focus on the position of your hand, your grip, your technique, and the forming of the stroke.

- Ascending stem loop: Fill a page with ascending stem loops. Focus on the transitions and increasing your consistency . After each row of ascending stem loops, review them and think about how you can improve for the next set.
- Entrance stroke + ascending stem loop: Practice connecting the entrance stroke with the ascending stem loop.
- Entrance stroke + ascending stem loop + compound curve: Practice connecting the entrance stroke to the ascending stem loop and compound curve. This forms the letter h!
The following practice is using two boxes per line (see how the x-height is equivalent to two boxes on my graph paper?). This option of guidelines is helpful for smaller brush tips and/or smaller writing in general.

If you mess up, keep going. Focus on the next stroke. Remember that you will only improve when you keep on practicing and experimenting and learning.
Video: The ascending stem loop
Watch the video below to see a demonstration of the ascending stem loop and practice drills you can start today!
~ ~ ~
It’s your turn! Tell me in a comment below:
Have you tried the ascending stem loop? How would you describe your experiences so far?
What is the hardest part about the ascending stem loop for you?
Are you sharing your work on Instagram? Be sure to share by tagging #pieces_basicstrokes!
~ ~ ~
Cheers,

P.S. If you liked this post, please share it with a friend!
P. P. S. If you haven’t already done so, subscribe to my blog below so you get my posts directly in your inbox!
Follow me on Instagram: @piecescalligraphy
Watch more videos on YouTube: piecescalligraphy
~ ~ ~
Supplies used in this post and video:

I’ve been waiting all day for this! And I’m ready to launch into the next skill. Practice is very relaxing for me.
LikeLike
Yay, Andrea! You enthusiasm is so appreciated. I am with you on the relaxing part… add a glass of wine and I am just dandy. 😉
LikeLike
Yay!! I love Sundays becaise its basic strokes night. I hope the ascending stem loop is not as rough as ovals. I have pages of horrible O’s. Even so, i am so grateful for you Sharisse and all you have given to us. 😊❤️
LikeLiked by 1 person
Hey, Noah! You are so awesome – thank you so much for your constant support! The ascending stem was tricky for me to teach! One of the things I learned as I prepared today’s blog post and video is that the ascending stem loop will vary in look depending on a person’s preference. I am not a stickler for the absolute right way – but I certainly want to instill certain fundamentals. So don’t beat yourself up when you don’t think your ascending stem stroke (or any basic stroke for that matter) doesn’t exactly come out how you desire it to be. Focus your practice primarily on form and consistency. 🙂
LikeLike
Well, I need a lot more practice, but I love coming here every week and seeing the new techniques, even if I’m not ready to try them yet. ♥♥♥
LikeLike
Hi Sharrise,
It is so easy to support such an awesome teacher!! I am probably more of a stickler for it being as close to exact while learning because i dont want to learn bad habits, then later i can change styles. But thank you for the support and not being to strict with everything. Lol. Thank you so very much and i am so looking forward to the guides and my offer to help is always there if you ever need anything.
Noah 🙂
LikeLike
You make total sense. I found it difficult for me when I first learned calligraphy – I tried so hard to replicated exactly what I saw. Then the final lesson was on developing your own style! It was such a challenge to shake my habits of writing like the instructor! It certainly takes time and lots of experimentation to find your own style. And the awesome thing is: Even your personal style will evolve over time! We must embrace wherever we are in our journey. 🙂
LikeLike
Hi, Charisse! I have a problem. Everything I do in calligraphy seems to me very “school writing”. All the results I get seems to me like a 6 years old girl work… I don’t know how to explain better myself (I’m spanish). Even when I first went to a calligraphy class, my teacher said “oh, your work remind me to the school calligraphy!” (she was trying to be nice). What’s the point? Should I practice more? I’m afraid I’m doing something wrong, bad habits or something like that… Should I try another kind of letters…?
LikeLike
Hi there! I am unsure what you mean by “school writing.” Do you mean calligraphy that is more traditional and formal? What kind of a style do you prefer? It is really up to you to decide what kind of style you like. You do not have to stick to just one. You can try different styles, experiment, or just practice one style at a time.
Send me a photo of your work. I’d love to see what you are describing and hopefully I can provide some tips for you.
LikeLike
I am so glad I found your website! I have been following your tutorials and find I am easily mastering the techniques because your tutorials are so easy to follow and are explicit. I’ve tried some from others and wasn’t so successful. I look forward to practicing and then seeing how I can put it all together. Thank you for your time and effort with your website.
I’ve having so much fun!!
LikeLike
Thanks so much, Rebecca! I appreciate the feedback. While I am currently on a blogging break, I am avidly taking notes on what works (and what doesn’t) so I can create more materials and helpful guides for you! Let me know what else you need help with.
LikeLike