

Welcome to Part 4 of my Basic Brush Calligraphy Strokes series!
So far, we have reviewed the:
Before you get started, be sure to familiarize yourself with these previous posts:
- Brush pens recommended for beginners
- Holding your brush pen properly
- Facing your brush pen in the right direction
If you are on Instagram, share your work by posting it with the hashtag, #pieces_basicstrokes.
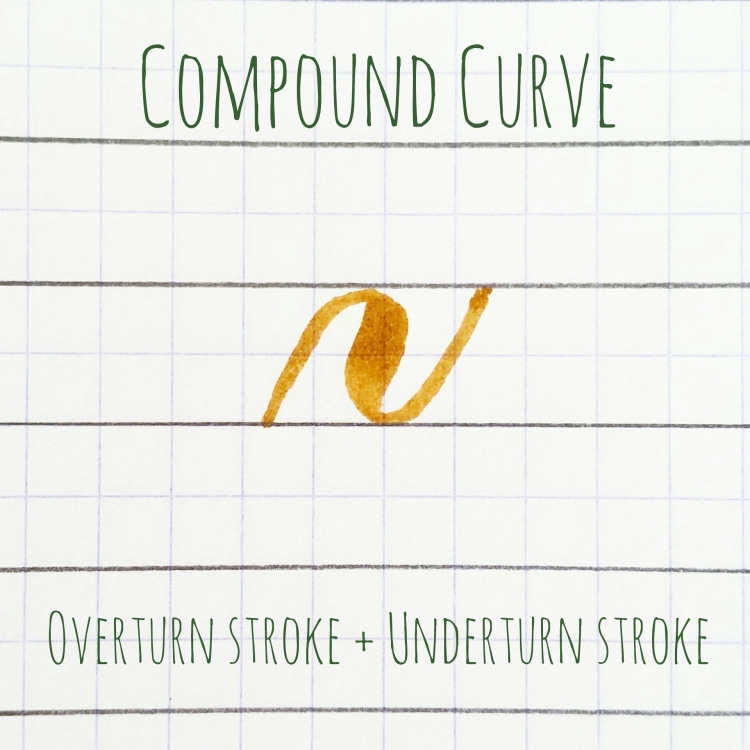
Now, let’s talk about the compound curve!

What is the compound curve?
The compound curve is a combination of two strokes: the overturn stroke and the underturn stroke. The compound curve starts in the same fashion as the overturn stroke, but before the thick downstroke ends at the baseline with full pressure, it transitions into a thin stroke and ends in the same fashion as the underturn stroke.
Essentially, the compound curve consists of three lines, two hairlines and a thick stroke, and these three lines should be parallel.
How to create the compound curve
To create the compound curve, begin as you would the overturn stroke. Start at the baseline and begin making a thin upstroke, or “hairline,” using little to no pressure on your brush pen.
As you approach the waistline, create a curve toward the right that resembles an upside-down u-shape. Touch the waistline, and then begin making your way down toward the baseline. Up until this point, you are still creating a thin stroke.
Once you are drawing your stroke downwards toward the baseline, slowly transition from thin to thick. You will reach full pressure briefly – notice the thick stroke after the waistline.
But BEFORE you reach the baseline, transition back to a hairline and start curving the line. Touch the baseline, and then begin make your way back up, maintaining the thin stroke.

You may be shaky at first, or unfamiliar with how the stroke should feel as you create it. But as always, practice makes progress. I share practice drills at the end of this post for you to work on.

When to use the compound curve
The compound curve is used in the letters: h, m, n, v, x, and y.

Practice Drills
Do these practice drills to improve your compound curves.
Don’t worry about being perfect or creating strokes that are completely free of any shakiness. Shakiness is expected in the beginning! When you are still learning the brush pen and when you go slow (which you SHOULD), then shakiness is normal.
The key with the compound curve is to pay close attention to the transitions.
Try these practice drills. Focus on the position of your hand, your grip, your technique, and the forming of the stroke.

- Compound curve: Fill a page with compound curves. Focus on the transitions and increasing your consistency . After each row of compound curves, review them and think about how you can improve for the next set.
- Overturn stroke + compound curve: Practice connecting the overturn stroke with the compound curve. This combination forms the letter n! You can also combine two overturn strokes to practice the letter m.
- Connecting compound curves: Connect compound curves to each other without any breaks in between. Go slow at first, but try to find a rhythm as you write. This rhythm will help you immensely as you begin to write more. Note: lift your pen completely off the page before starting the next stroke. The idea is to draw the strokes so they appear to be connected, but in actuality, you are creating each stroke individually.
If you mess up, keep going. Focus on the next stroke. Remember that you will only improve when you keep on practicing and experimenting and learning.
Video: The compound curve
Watch the video below to see a demonstration of the compound curve and practice drills you can start today!
~ ~ ~
It’s your turn! Tell me in a comment below:
Have you tried the compound curve? How would you describe your experiences so far?
What is the hardest part about the compound curve for you?
Are you sharing your work on Instagram? Be sure to share by tagging #pieces_basicstrokes!
~ ~ ~
Cheers,

P.S. If you liked this post, please share it with a friend!
P. P. S. If you haven’t already done so, subscribe to my blog below so you get my posts directly in your inbox!
Follow me on Instagram: @piecescalligraphy
Watch more videos on YouTube: piecescalligraphy
~ ~ ~
Supplies used in this post and video:

I loooove Sunday nights. I have been barely able to contain myself waiting for step 4. Sharrise has renewed my desire to learn letter that has elluded me and after many, many failed attempts i have learned in a week more than all of my combined previous attempts. Thank you a million times Sharisse. 😊❤️
LikeLike
Hi, Noah! You are rocking those basic strokes! It is awesome to see your renewed desire to learn. I am so honored to be a part of your journey.
LikeLike
Sharisse,
Thank you forcyou nice comments, it is very encouraging. Having a great teacher makes it easy to practice and want to get better as well as motivates me. There is a lifetime of thanks you’s and wil pribably still not be enough to get the appreciation you deserve. 😊❤️
LikeLike
Always grateful for your support, Noah! I am really looking forward to seeing you create some amazing things!
LikeLike
Enjoying your videos very much. Thank you for taking the time to do all of these tutorials. ♥
LikeLike
As always, you are very welcome, Shari!
LikeLike
Sharrise, I am absolutely loving your blog & posts! Thank you for taking the time to share your talent with others. I am a brush letter newbie (about 2 months, now), and you have been extremely helpful. Thank you, again, and I hope you & your family have a Happy Thanksgiving!
LikeLike
Thank you so much for your kind words, Rayna! Have a wonderful Thanksgiving as well!
LikeLike
I so look forward to each new blog post!!!!! Later tonight when life calms down, I will give this post a thorough reading and watching, then start practicing….
LikeLike
Awesome, Andrea! Excited for you to practice with me! 🙂
LikeLike
Hi Sharrise, As usual great video and thank you for the wonderful steps.
May I ask, would you recommend any slants degree and would having a guideline with the slants helps with the consistency of the parallel line?
Love to hear from you.
Big hugs.
Lynn Yap
LikeLike
Hi, Lynn Yap!!! So nice to hear from you here on my blog. I get overwhelmed with Instagram so I love getting blog comments where I can breathe as I reply 🙂
GREAT QUESTION regarding slant degress! I do recommend either a 55 degree slant (as required by traditional copperplate calligraphy) or 65 degrees (which I got from Melissa Esplin during her online class). Check out Nina’s blog because she has links to really good guideline worksheets (go to “Learn Copperplate” and you’ll find “Printable Guide Sheets.” Also, the IAMPETH website has a lot of free printable guides with slants, too! I’d love to hear how they work out for you – let me know!
LikeLike
HI Sharrise!
Thank you for your posts on basic strokes! They are really useful!
Just a quick question,
How do you connect the alphabets AX ?
and I can’t seem to get a hang of multiple compound curve 😦
LikeLike
Hi Wendy! You might have to connect the a and x by breaking up the strokes in between. After you create the underturn in the letter a, stop BEFORE you reach the waistline. Then continue the stroke and create the compound curve to create the x. Let me know if that makes sense!
LikeLike