

In previous posts, I gave overviews of how to hold the brush pen and the angle at which you should hold it. I explained that the key to writing with the brush pen is to focus on the angle of pen to the page, and that you shouldn’t hold the pen upright.
But I didn’t tell you the full story.
I didn’t explain that it’s not just the angle you should be concerned about.
I didn’t mention that there is more to laying out your paper correctly and positioning your fingers around the pen comfortably.
I didn’t tell you that there is one more – one extremely important – aspect about holding the brush pen that you must realize.
In addition to holding your brush pen at an angle, you must pay close attention to the direction at which your pen is facing.

After I explain what I mean by the “direction” your pen is facing, I demonstrate this concept in a video at the end. So stay tuned… or scroll down and start watching!
What direction is your pen facing?
You are already holding your pen at an angle, but what direction is it facing?
If you were to extend the end of your pen outwards into the room, where would it end up? Would it be pointed behind you? To your side? Or in front of you? The direction your pen is facing is key to creating the brush calligraphy you desire.
Think of it this way: Imagine an X and Y axis (yes, I’m bringing back that algebra you never thought you would need), and pretend the X axis represents your paper, or your writing surface. Then pretend the Y axis represents your pen.
In my diagram below, pretend the red line is your paper and the yellow line is your pen. Imagine that you are holding the pen at an angle in relation to your paper.

While this matches exactly what I have been teaching, what we need to realize is that we live in a 3-dimensional world. The objects and people around us are not simply plotted along an X and Y axis. There is a third, and almost more crucial, axis we must consider: The Z axis.
The Z axis: Pointing your pen in the proper direction
After you set up your page (X axis) and place your pen in your hand (Y axis), now take a look at the end of the pen.
What direction is the end of your pen pointing? Does it point to the side, behind you, or in front of you? Let’s make sure your pen is pointed in the exact direction that will allow you to write properly.
In order to achieve your desired brush calligraphy look, let’s focus on the Z axis. The “direction” that I am referring to is what will be placed along the Z axis:

In my video below, I explain and demonstrate the Z axis concept. It may be challenging to follow my instructions above without seeing me show you “in action.”
The direction your pen faces affects your desired slant
Let’s now bridge the concept of the direction your pen faces to the slant at which you want your brush calligraphy to follow.
How much of a slant do you desire in your brush calligraphy? Do you want very slanted letters, slightly slanted letters, or completely upright letters? Here are some variations of slanted letters that you may like:

Draw some lines that would be parallel to your desired slant. These lines are essentially the guides that you want your letters to follow in order for you to achieve your desired slant.
If you will notice in my photo below, the slant that my letters naturally follow is at a pretty steep angle. In particular, notice how the stem of my letter “l” and “t” are parallel to the slanted lines.
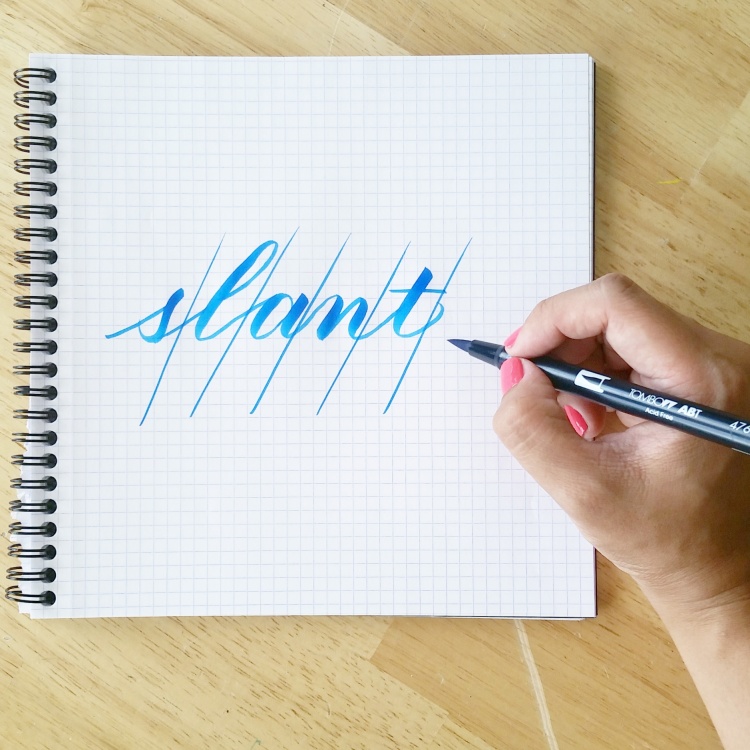
Now, notice how my pen is facing in a direction that is perpendicular to my slant lines. This is the key that I want you to take away today! You must pay attention to the direction your pen is facing in relation to your slant lines.
Take your brush pen in your hand, at an angle, and position the pen so that it is exactly perpendicular to the guide lines you just drew. This may mean that your pen is pointed to your side, or it may be pointed in a direction that is different than mine. You will see in my video below how the direction of my pen allows me to write in my style of brush calligraphy.
Video: Notice the direction your pen faces
~ ~ ~
It’s your turn!
Have you noticed the direction your pen faces?
Have you observed how different directions effect the slant of your letters? Let me know how it goes for you!
~ ~ ~
P.S. If you liked this post, I’d love if you would share it!
P. P. S. Be sure you are subscribed to my blog below so you don’t miss a post!

Hi Sharisse! That was verry helpful! I was wondering why sometimes I get nice thick lines and sometimes not so thick lines. Does this angle change for the up strokes or thin lines?
LikeLike
Hello and thank you so much! I’m glad you found the post helpful. I do not change my angle for upstrokes or thin lines. What you need to focus on is the amount of pressure you are applying to each stroke. For upstrokes, apply light or little pressure. For downstrokes, apply more and heavy pressure. I have another post for applying pressure – see my “Learn” page to find it! Hope that helps!
LikeLike
Yes, so helpful!! My pen is always all over the place which explains why my slants are never even. Thank you!
LikeLike
Hi, Micah! I’m glad it was helpful! You are so welcome 🙂
LikeLike
I have spent a number of hours reading your posts and I’m learning lots and enjoying them. I have one request for you. In a lesson post you mention studying your letters and the thick and thin line transitions. Would it be possible to get a PDF of the all the letters so we have something for reference? Thanks! Read you (see you) next Sunday!
LikeLike
Hi Joyce! Wow – the PDF of all the letters is EXACTLY what I am working on! Hoping to make it available real soon… Thank you so much for reading! And yes! I can’t wait to “see” you 🙂 🙂
P.S. Joyce, what is your Instagram account? I feel like I know you from IG…
LikeLiked by 1 person
I’m laughing about the instagram thing. I am on there but I don’t think I’ve ever posted anything. I wish we did know each other but sadly, it’s not from instagram.
LikeLike
Hello, is the PDF of the letters for practice available somewhere now? 🙂
Many thanks!
LikeLike
Hi! Yes, go to my learn page (piecescalligraphy.com/learn) and find the worksheets section at the very bottom. Let me know if you find it!
LikeLike
Awesome technique! I can’t wait to practice using this visual of the end of the pen direction . I become hyper focused on the point of the pen and angle of the paper that I forget about holding the pen . I am sure that this will be helpful!!
LikeLike
Glad to help! Yes – it’s easy to forget certain aspects when you are focused on others. With time and practice, certain things will start to become very natural and second-nature to you, which will allow you to be more consistent and intentional. Let me know how your practice goes!
LikeLiked by 1 person
Oohh…this is great. I’m just learning to work on my slant and I think this might be effective for lefties too? Just perpendicular from the other direction, at least for me.
LikeLike
What a great tip! This is going to help me out so much! Thank you for all your hard work! I love reading your blog 🙂
LikeLike
Hi Sharise. Love you videos, Instagram feeds. So helpful to those of us starting out. I just recently started with brush calligraphy and purchased 3 tombow dual tip pens. 1 of then I can write really nicely with. The other two a black and blue seems to be more difficult with the nibsseeming to be a bit frayed. Do you think this is just my technique and a learning issue. Have you experienced this with some of your pens. I can control the green brush pen which is the same type of pen as the others quite well. Thanks Sharise.
LikeLike
Hi Colleen! It could very well be the type of pen you are using or the wear and tear on the pen that is inevitable over time. Have you read my post on hairline upstrokes? See here: https://piecescalligraphy.com/2015/10/11/the-reason-you-should-focus-on-the-thin-stroke-but-not-the-hairline/. Hopefully that post helps with some troubleshooting. If not, let me know.
LikeLike
Aloha, I just saw your post on my Google+ and it’s really helpful. Your handwriting is so beautiful! Thank you for sharing. I noticed that if you were to lay your marker down in the same perpendicular angle you are writing your slant letters, it would form an “x.” This is going to help me — thank you ♥
LikeLike
Aloha! You are so welcome and I’m so glad to hear the post helped you. Happy writing!
LikeLike
Hi! Thanks for all your tutorials! Regarding direction of the pen, any tips for me or my daughter who are lefties?
LikeLike
Hi Rochella! Yes! I have a couple of blog posts specifically for lefties. Check them out on my “Learn” page, or go here: https://piecescalligraphy.com/learn. Let me know if you need help finding it or if you have any questions. I also include references to some left-handed calligraphers who are more than willing to provide guidance. 🙂
LikeLike
I have to say this was an amazing tip.. I just happen to random come across your page and I will be visiting it more frequently. You’re unbelievably amaZing!!! Thanks so much!
LikeLike
Awesome, Ginny! So glad you are here. Happy writing!
LikeLike