

Maintaining control over your brush pen is crucial when first learning brush calligraphy. However, it can be a challenge figuring out how to best hold the pen, control your movement, and position your body, arms, and hands.
The hardest part is finding what works best for you. Even after I share with you how I hold my brush pens and write with them, you may find alternative ways that work better for you! The key is to experiment, learn, and practice.

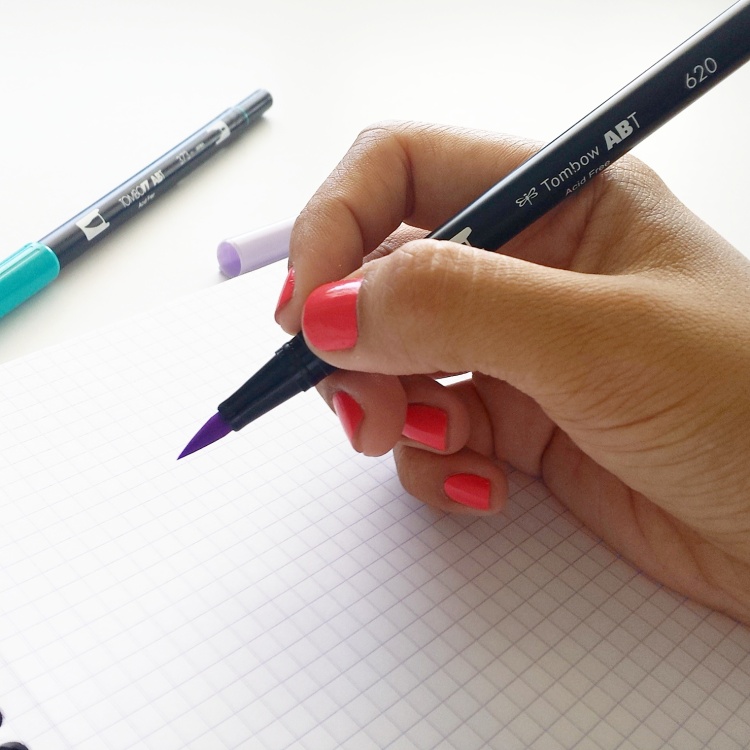
brush pen vs. pointed pen
The brush pen is a great first tool to use when learning how to write calligraphy because it is a lot simpler to use than the pointed pen.
While both types of pens allow you to achieve calligraphy, the main difference is that the pointed pen strictly requires a specific grip. It must be held in the way many of us were taught to traditionally hold a regular pencil (watch my video below for a demonstration). In addition to this type of grip, the pointed pen must be angled in such a way that the downstrokes are parallel to the pointed end of the nib. This skill takes much practice and getting used to before writing with the pointed pen is very natural.

On the other hand, the brush pen can be held in many different ways and it will still write. The most important aspect to focus on when gripping the brush pen is the angle at which the tip is on the page. The brush pen tip should be angled in order for you to apply different pressure to the pen and achieve those thin and thick strokes that define calligraphy.
The less angled and more straight up toward the ceiling, the brush pen does not create calligraphy strokes. Instead, it starts to look more like a regular marker with equally wide strokes, which can still be used to create beautiful writing, but not necessarily calligraphy.
Gripping the brush peN
There are different ways you can grip the brush pen to create beautiful brush calligraphy. The pen can be held in the traditional way a pencil is gripped. It can be held in non-traditional ways, too, as long as it is held in the appropriate angle.

I have found that the key to writing with the brush pen is to focus on the angle of pen to the page. To achieve this, you have to make sure that whatever grip you choose allows you to easily apply different amounts of pressure as you write.
Positioning your hands and arms to write
I realize this section may be difficult to follow by reading, so be sure to watch my video at the end for a demonstration!
When preparing to write, first be sure that you are seated with your body facing forward. Then place a pen in your hand and hold it as if you are about to write (but don’t write just yet).
Depending on the angle you want to write your letters, you will turn the page so that you are not rotating your hand. You want to find the angle of the page that works best for you. This will take time and practice to figure out the best angle you want to write, and it also depends on the style you are trying to achieve.
Once you find the grip that is comfortable for you, you should NOT be changing the angle of your pen as you write. The pen should remain in the same angle and instead your hands and arms will move across the page. You may move your wrist as needed, but for the most part, you do not want all the movement to come from your wrist.
Aim for controlled, intentional movement. Don’t worry about being shaky or not achieving the exact results you desire. Focus on building good habits now, so that you learn from a good foundation.
As I have stressed in previous blog posts, go slow and practice the basics. Do your drills and write the alphabet over and over, being conscious of how you are holding your pen. Once you find a comfortable grip and your pen is at the right angle, keep practicing!
Video: How to Hold the Brush Pen
Watch this video below as I demonstrate the concepts discussed in this post:
~ ~ ~
It’s your turn!
Have you found a grip for the brush pen that works for you? How did you discover it?
Which concept above would you like to see explained and demonstrated in more detail?
~ ~ ~
P.S. If you liked this post, I’d love if you would share it!
P. P. S. Be sure you are subscribed to my blog below so you don’t miss a post!

So I had an aha moment just before minute 4 when you were showing the pen slant vs straight up and down. The paper positioning is a good reminder too. It’s interesting that you say brush pens are easier than pointed pen because I have really struggled with them more than a pointed pen but I will keep trying keeping your suggestions in mind. I might suggest using a darker pen for better contrast next time. Sometimes the light ink was a bit hard to see.
LikeLike
Hi, Lisa! Thanks for visiting and watching! That is so interesting because I struggled in the beginning with pointed pen! Maybe it’s a challenging for you since you already knew how to use pointed pen.
Yes, lighter inks are hard to see. I also prefer ink that is not completely dark that the ink goes onto the page a solid color, without any gradient. The only reason is just a personal preference because of the cool gradient look of certain inks. If you see my previous two posts in maroon and gold ink, you will see what I mean!
Happy writing and let me know how things go!
LikeLike
I watched your other videos and really liked the peach and pink combo. It’s also great to see all the different ways you can use Tombow markers! I really like the lavender color marker you used in this video and think that I might actually own it. I just think when filming it is easier to see when there is more contrast due to the camera angle and glare from the light. Thanks so much for sharing all you know. Videos are so helpful and the best thing next to live instruction. I totally agree with your post on the importance of taking classes. And hope to build on the one I’ve taken. When you can’t sleep and you want to practice your letters- youtube is an awesome middle of the night companion! Anxiously waiting for your next post!
LikeLike
I am not anonymous! I am Lisa! 😉 My bad!
LikeLiked by 1 person
Hi, Lisa! You are so welcome! I am glad to help you be productive when you can’t sleep! What excites me almost more than the brush pens themselves are the colors. So much fun, so vibrant… but it definitely is hard to photograph lighter colors!
LikeLike
This is really helpful! As a lefty, I struggle with the angle of the pen as we tend to ‘push’ our writing rather than ‘pull’. But positioning seems to be key – body, arms, hands, paper THEN pen. And being patient. 🙂
LikeLiked by 1 person
Ahh!!! Another lefty comment – I am going to round up my lefty calligrapher friends to share some insight and tips for lefties! Yes – being in the right position, having space for your arms and elbows to move about, and then positioning the paper in the best way for your writing style – all so crucial to improving and achieving better results!
LikeLike
I am so glad I found your blog! This was such an informative post. I’ve been practicing calligraphy with Tombow brush pens for a little over two months and I feel like the very tip of a few of my pens have sort of.. frayed, for lack of a better word to describe. Do you know if this is normal wear and tear or is it a result of improper use? Oopsies.
LikeLike
Hi, Niki! Glad to have you here – thanks so much for visiting! I am going to have to do some research on dealing with the fraying of the pens. I have experienced a bit of fraying myself. My initial thought is that it has to do with wear and tear. I will work on a future post to address this issue! Thanks for bringing it up.
LikeLike
– wow, thank you so much for these very helpful videos. I have been following you on instagram, just now catching up on your tutorials. I recently received my Tombow hard and soft pens, the up and down strokes video is helping me a lot. Practice makes progress, not to mention patience. Great job, thank you.
LikeLike
Hi, Haydee!!! I’m so happy to have you! Thanks for visiting and for your sweet words! Please let me know what you’d like to see in future tutorials and videos! 🙂 🙂 Happy writing!
LikeLike
I too struggle with brush pen compared to pointed pen. This helped so much though. How do you keep your writing straight though when u aren’t using a grid paper, say for a finished product when you paper is turned to the side so? I can “sight” a lot of my own writing without having to pencil it out first but there’s no way I could do it at this angle without the grid lines. Thanks Sharisse!
LikeLike
Hi, Karen! I use a light pad, or I lightly write the lines with a ruler and pencil and erase afterwards! Without any tools (light pad, ruler, pencil), I would NEVER be able to write in a straight line!
LikeLike
Thanks so much for this. Answered a ton of questions. Also loved your post with the left handed calligraphers. Huge help!
LikeLike
Hi Elizabeth! You are so welcome! Glad to be helpful! Please let me know if you have any questions or struggles you would like to have addressed in future posts! Happy writing 🙂
LikeLike
I’m a beginner to calligraphy, and I recently decided to start learning. I just bought my first 3 pens (I got the recommendations from your guide 🙂
I bought one tombow dual, a pentel dude and a tomboy fudenosuke 🙂
I’m just getting started and your blog is so helpful!!
Wish me luck and patience 🙂
Thanks so much!
LikeLike
Hey, Liz! I am thrilled to hear! Wishing you all the luck and enjoyment with the pens. Be sure to enjoy the process. It can be challenging at times, but I hope my tutorials and videos help. Let me know what questions you have. Happy writing!
LikeLike
My thin upstrokes tend to be somewhat shaky. Any suggestions or just more practice?
LikeLike
Hey, Marlene! Shaky is definitely normal. In fact, I still have shaky strokes! I think it’s a combination of how relaxed/tense I am at the moment and how fast/slow I am going. But always remember that shaky is OK, so long as your are practicing a good grip and focusing on your letterforms. It will get better with time and practice!
LikeLike
Oook thank you for this! Ive been practicing with your tutorials and there is still not that much of a difference between my upstrokes and downstrokes 😦 Practicing some more.
My brushpen is a Koi :p Maybe I should also look for the Tombow haha!
LikeLike
The upstroke is a challenge! It takes a lot of control, practice, and getting used to your pen to create that thin upstroke. I shared another post on the thin upstroke that emphasized the importance of not focusing so much on getting the upstroke very thin, and instead focusing on form and ensuring that your upstrokes are significantly thinner than your thick downstrokes. I hope that helps!
LikeLike
I am used to a quadrupod grip for my writing (just like how you write normally as you demonstrated in the video). I was wondering if it is significantly easier to achieve the calligraphy effect by using the tripod grip instead? I have been deciding on whether I should change my grip. Thanks for the awesome video! 🙂
LikeLike
Hi there! I haven’t heard of the grips referenced with those terms before (quadrupod and tripod). Do you have a photo or online article you can show me? My best recommendation is to keep trying different grips and even go back to ones you’ve tried but didn’t initially like. You never know right away what will be most comfortable for you. SO it’s totally OK to try new things and learn as you go.
LikeLike
Hello!
I’ve started using your guide to get started with brush calligraphy (LOVE IT BY THE WAY). I picked up the Tombow Dual Brush Pen on Saturday and today (Tuesday) I picked it up to do some drills on my lunch break, but it was frayed and giving me really streaky strokes.
Is there anything I can do to restore the tip?? I literally used it Saturday and Sunday only (maybe a total of 8 hours, tops), I used it on a smooth, lined paper (notebook from the art store) and I made sure to read your blog 3 times about holding it at the proper angle (with respects to both the paper and the slope), so I don’t think this is from mis-use. Of course the receipt got thrown out during my Sunday cleaning (because I was happy with the pen), so I don’t think I can take it back to the art store (which is also 45 minutes away).
Do you have any suggestions on what I can do? The pen is brand new, so I’m really hoping I can fix it and don’t have to replace it. I’m really disappointed this happen… THANKS IN ADVANCE!
LikeLike
Hi Emma, brush pens made from felt (such as the Tombow dual brush) can still fray, even if you are holding them at an angle and using smooth paper. Do you find it fraying a significant amount? Like are you unable to create thin/thick lines? Or are the edges of your strokes very rough and jagged? Sometimes your pen can also just be a bad one, unfortunately. You can try to call Tombow USA customer service and they may replace it. Otherwise, keep the pen for practice and sketching out designs before you do a final piece. I rarely throw out pens unless they are just out of ink. Sorry that didn’t really help with your current pen! Because of the type of pen, they usually cannot be repaired.
Try the Koi coloring brush or smaller pens such as the Pentel sign pens (with a brush tip). I find that those pens do not fray as easily, so they are a better investment. 🙂
LikeLike
Thanks so much for this video. Am just wondering what font this is? It is SO beautiful! x
LikeLike
Hi Ingrid! This is actually considered a “script,” rather than a “font.” A font refers to using exactly the same letter forms over and over, such as the font on a computer or typewriter. A script is handwritten and can reflect any type of style or technique.
The script I used here is a modern brush calligraphy. It’s also inspired by copperplate calligraphy. 🙂
LikeLiked by 1 person
I love your site! Very helpful for those of us starting out. I’ve found at least when you’re very new, that the Tombow Fude… (I forgot the name of it.. it’s in Japanese) STIFF brush tip is much easier when you are trying to master the thin upstrokes. You do have to push harder on the downstrokes but it bounces back easier to get that nice fine upstroke and gives a nice size contrast. Once I get down the habit of pushing harder on the downstrokes I’ll work on letting up more on the upstrokes. I love brush calligraphy!
LikeLike
Thank you and welcome, Rachael!!! Yes, the Tombow Fudenosuke HARD tip is great. Glad you’re loving brush calligraphy!
LikeLike