

The variation of thick and thin strokes truly define calligraphy. It is important to practice these different strokes and understand how they connect to form each letter. This is advice I am sharing with you that I wish I could have embraced better when I first started.
When I first started doing calligraphy, I wanted to hurry up and learn the basics so I could move on from simple strokes to writing full song lyrics and wedding vows. After wasting tons of paper, I quickly realized the importance taking the right steps instead of jumping ahead.
As I mentioned last week, slow is smooth and smooth is fast. You must (I repeat, YOU MUST!) go slow. Don’t rush it, don’t skip steps. You will get there. As with anything challenging, learning brush calligraphy takes time and patience.
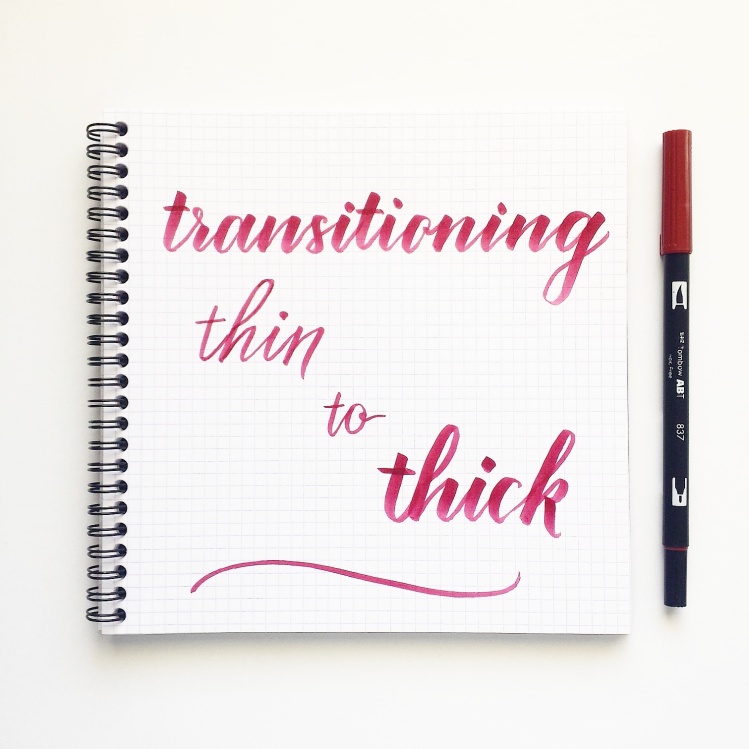
Try these tips to better understand transitioning from thin to thick lines:
1. Get familiar with your pen.
Every pen is different. Some have more flexible tips than others, some have bigger tips than others. These factors translate into how much pressure you need to put to achieve the various strokes. It also defines the stroke sizes you can expect from the pen.
Do this 3-part exercise with every pen you try:
- Write a small stroke, about an inch in length, with as little pressure as you can. Think “hairline.” Barely touch page.
- Then write the same strokes with a little bit more pressure, sort of like a medium pressure. Both this stroke and the hairline take the most control (don’t worry if you’re shaky).
- Now write with full pressure! Press down as you write the strokes to the max the pen tip will allow you to.

Doing these three different strokes with EVERY PEN you try will help you better understand its limitations. This is crucial to learning how your writing will turn out.
2. Strive for consistency
Consistency will allow you to build that muscle memory. Consistency will free you from struggling to remember how a letter should look. Consistency will give you the confidence to write smoothly.
Don’t strive for perfection. Instead, be consistent.
Try these strokes below. You’ll notice I gradually went from single strokes to connecting them.

This is the practice you need to commit yourself to each day, or each chance you get to practice. Don’t rush into the words. They will come. Build a solid foundation first and develop good habits now.
3. Learn when to transition.
Now it’s time to study each letter.
Notice how each of the letter below are made up of individual strokes. See the way they connect to each other. Observe where each stroke transitions from thick to thin and vice versa.

In my demonstration below, observe how I break down each stroke of the letter “a” and then slowly build up the steps to create the final version.

As I explained in last weeks blog on improving brush calligraphy, it is important to take the time to break down a letter to its bare bones, and then slowly build that letter.
Watch my demonstration below to see all of these tips in action!
Thanks for reading and watching! Happy writing!!!
~ ~ ~
It’s your turn!
What other questions do you have about brush calligraphy?
Which tip would you like to see explained and demonstrated in more depth?
~ ~ ~
P.S. If you liked this post, I’d love if you would share it!
P. P. S. Be sure you are subscribed to my blog below so you don’t miss a post!

Nice, Sharisse! 👏🏻👏🏻👏🏻
LikeLike
Thanks, mama!!! xoxo
LikeLike
I think the one thing that has helped me in creating smoother transitions, is figuring out at which point in the letter to switch from light to heavy pressure, and vice versa. I had to learn that strokes really transition from light to medium to heavy. So, your tip on learning a brush’s medium pressure stroke is spot on!! Great post, Sharisse!
LikeLike
Yes!!! I realize that I BARELY touched on the surface when it comes to WHEN to transition. I plan to go into detail with EACH LETTER in the future! Thanks for the feedback, Stephanie!!!
LikeLike
I just wanted to say thanks for these posts. I’m trying to learn this with a paintbrush and watercolor and it’s been challenging! I’m going to get a brush pen!
LikeLike
You are so welcome! Thank you for stopping by! Yes, I do feel a brush pen is such a great beginner tool. I tried watercolor myself and quickly stopped when I realized how complicated it could be! I certainly want to try it again in the future, but for now, it’s the brush pen 🙂
LikeLike
Amazing post Sharisse!! It is really helpful!
I also found out something that might be a mistake for most beginners (or maybe this happened only with me lol), but I was trying to write holding the brush pen in the same way I usually write with regular pens… Was only when I tried writing with a real brush and watercolor that I saw it gave another result. So I tried holding my Tombow as if I was holding the watercolor brush and I started having the desired result! So happy!! I don’t know if that’s the right way to go, but it certainly helped haha 😀
LikeLike
Hey, Carol! That is an amazing observation you made and even more wonderful it helped you out in writing with the Tombow! Other folks have asked about how to hold the pen – I will certainly remember to share your helpful tip when I write that post! Thanks for sharing! 🙂
LikeLike
Hello from Hawai’i! Thank you so much for these posts. I originally found you on the explore page on Instagram and have since followed you. I LOVE your work and you have inspired me to invest in the Tombow Dual Brush Pens. It’s frustrating at times because I can’t get these thick to thin transitions. However, I’m starting to practice more so hopefully I’ll see some results.. Haha. I really appreciate this post and continue to look forward to more posts! Thank you again!!!
LikeLike
Hello from California! Thank you for visiting and for your sweet words. I am so glad Instagram connected us! Yes, keep up the practice and let me know how I can help you. I initially did not love the Tombow until I really got familiar with it and gained more control over it. You’ll get there!
LikeLike
Great video! So much info! Love to watch your rythem. I def need to get my practice on! I think I need to go back to these basics before I think I can just write away! Thank you for sharing!
LikeLike
Thanks, Jossie! You can also spend the last 5-10 minutes of your practice time to “write away.” I would always try to make a point to either do the entire alphabet or fill a page with some strokes that I’m struggling with. Then I’d put away all the drills and just write and write and write, not worrying about whether I’m doing it the correct way or not. This way, you can fulfill your desire to start writing, but you discipline yourself to do the much needed practice 🙂
LikeLike
This video is so helpful! I recently bought a cheap set of brush pens to practice with to see if I want to buy a Tombow or other good set. I was shocked how difficult it was, since I have a pretty decent “script” handwriting ability. Who knew they were a completely different art (ok, I had heard that all along.) This really helps with the beginning steps, before the alphabet drills I was trying to start on. Thanks a ton!
LikeLike
Hey, Kate! So happy to hear the video helped! I am totally with you – at my first calligraphy class, I was actually disappointed to find out the Tombow is “just a marker.” But then I realized how hard it is to write with when your goal is calligraphy! Keep me posted on how things go with you! 🙂 🙂
LikeLiked by 1 person
Just found you through Instagram and what can I say?? Obsessed and impressed 😀
I love all your calligraphy tips and as I’m still working on getting used to my brush pen (I’m actually new to calligraphy in general) I definitely look up to you! And yay, I noticed we have the same blog theme. 😉
xx, Roxanne
http://www.themagicalcanopy.wordpress.com
LikeLike
Hey, Roxanne! So awesome to connect with you, especially lately on Instagram! You are too kind. I’m so glad to hear you are practicing. Let me know how else I can help. Heading over to check out your site now! 🙂 🙂
LikeLiked by 1 person
Thank you! So far calligraphy has been pretty challenging for me, learning how to control the brush and all, but that’s the whole point of learning I guess! And so nice of you to visit my site. 🙂
xx, Roxanne
LikeLiked by 1 person
Hello from the Philippines! Found you on Instagram where I was looking for tips on how to transition from thick to thin and voila! I’ve tried the strokes while I was reading and it made so much sense. 😊 Thank you!
LikeLike
Hey Rhodelie! That makes me so happy to hear! Thanks for letting me know how things went. Stay in touch! 🙂 🙂
LikeLike
Thanks for sharing your skills with us, Sharisse! Your posts have been very helpful.
LikeLike
I am thrilled to have you here, Linda. Thank YOU for visiting! 🙂 🙂 Let me know if there’s anything specific I can help you with!
LikeLike
I would love to see the whole alphabet! I love fonts and calligraphy but I am oh so very new at doing calligraphy myself. This video was super helpful!
LikeLike
I’m so happy you are getting into calligraphy and that you found the video helpful!
Are you on Instagram? I am hosting an alphabet challenge where my friend, Nina (@anintran), and I will be writing one letter a day starting tomorrow (July 9th). Everyone is invited to join in themselves!!! Hope you can join us. 🙂 🙂
LikeLike
Yes I am, and I currently follow you! I commented on your post about the alphabet the other day.
LikeLike
Yay! So happy to have you joining us 🙂 🙂 Thanks!
LikeLike
Thank you for this video and blog. I have experienced the woes of buying a LOT of pens at once. I’ll be doing drills soon! I bout the Tombow dual brush pen yesterday! Excited.
LikeLike
Hi Andonna! So happy to help. Thanks for visiting! Let me know how it goes with your Tombow pen! 🙂 🙂
LikeLike
I am still trying to get used to them… but I like them! So much to learn.
LikeLike
Thanks for all your videos and practice suggestions! All great ideas. Thanks for sharing your gift and talent.
LikeLiked by 1 person
You are very welcome! Thanks for visiting my blog! 🙂 🙂
LikeLike
Hello!
Thank you for sharing these tips. I’m practicing while watching the video; so it’s watch-pause-practice-watch-pause-practice 😉 I begin learning calligraphy for about 3-4 weeks approx.and I found out that my grip and angle is wrong 😦 My brush pen looks brittle at the tip T-T Thankfully I found your blog. Thanks!
LikeLike
Oh, I’m so glad you found me, too! You will be just fine. The fact that you discovered your grip and angle issue within 4 weeks is really good actually. Some have written for months and years with improper form. Happy writing!
LikeLike
Hello!
I’m not practicing everyday in that 3- 4 weeks, but after I watched your video and you said to go slow, I found it makes me relax and not stiff and nervous whenever I try to make it perfect. You were right, consistency is more important than make it perfect for a first timer. I can’t find the brush pen that you use, I use Sharpie brush pen. Previously I use Koi brush pen. I hope it’s enough for a first timer. 🙂
LikeLike
Hi, Adhitya! Yes, it is very helpful to be relaxed and calm. You will find yourself increasing your speed as you get more familiar and comfortable with each stroke. Don’t rush. The journey is the more rewarding than the end result.
Koi brush pens are perfect! They are what I currently use in my basic stroke series.
LikeLike
Oh, calm and not in a rush is not my nature ;)) I think learning calligraphy is my therapy from my work routine. (Just slooow down!) Thank you for having a chat with me. – Adhitya –
PS: I already follow your IG, I might ask more guidance there 🙂
LikeLike
Yes! Calligraphy and art in general can be so soothing for our soul. Frustrating at times, but certainly a wonderful outlet. And ask away! Thanks so much, Adhitya.
LikeLike
Had to leave a comment because your blog (and Instagram account) is seriously the most helpful resource when it comes to brush calligraphy. And I’m speaking from a total newbie point of view, heh. Thanks for all the videos/tutorials and free worksheets!
LikeLike
Aww, Elaine!!! Thank you so so much. That means to world to me, especially when I feel like I am not even giving my all to calligraphy right now. Working full-time and having twin toddlers doesn’t leave me with very much time in my day! Thank you again and happy writing! 🙂
LikeLike